

Nyxie: Custom qualifications and benefits for Sitecore Commerce
We are a company with extensive knowledge of the Sitecore Commerce platform. For one, we built Mercury e-commerce, a premium Sitecore Commerce Accelerator. Whilst building and/or implementing Commerce sites for our customers we occasionally see options that are missing in the default Commerce installation like promotion qualifications and benefits for example. These are lacking options that can be useful for (almost) every commerce installation. To fill the gap, we wanted to create a plugin with these options. That is how Nyxie came alive.
In this first of two blogs we will help you understand and create your own custom qualification and benefit. In the second blog we will dive into the display of these items and try to make it a bit more usable.
Creating qualifications and benefits
For this blog we will be creating two items:
- A qualification to check if the fulfillment of the cart has a specific value
“Cart fulfillment is [operator] [fulfillment method]” - A benefit to give a discount on the fulfillment.
“Get $ [amount] off the fulfillment costs”
To start with, we create a new Sitecore.Commerce.Plugin project which we will be using in this blog. After creation the project we can get all kind of Sample classes, just delete all of these.

Adding the qualification
First let’s start by making the qualification. Although the name in the user-interface is qualification, in the C# code we will be using another name for this, a Condition. This is because the interface you need to use is ICondition (or one of the extending interfaces).
Here's an overview of all these interfaces made with dotPeek.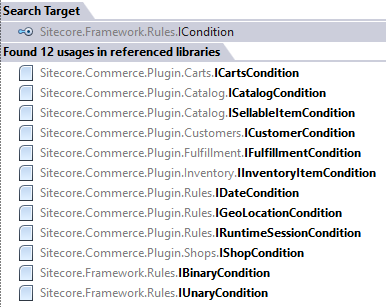
For this condition we need to do a check on the fulfillment. As you can see there is an IFulfullmentCondition so this will be the interface we will be using.
So let’s create a new folder Conditions, create a file named CartFulfillmentCondition and in this class implement the IFulfillmentCondition interface. We also need to add an EntityIdentifier above the class, the use for this will be discussed in the second blog.
[EntityIdentifier("Ny_" + nameof(CartFulfillmentCondition))]
public class CartFulfillmentCondition : IFulfillmentCondition
After creating the class, we can define what values we need to validate the rule. For our rule “Cart fulfillment is [operator] [fulfillment method]” we need two values, the operator and fulfillment method.
For comparison of two values, like the operator, the commerce engine has something we can use, namely a IBinaryOperator, and this interface needs to know the type of the values to validate. The commerce engine has classes that implement this interface with some default types (DateTime, Decimal, Double, Float, Guid, Integer, Long, String). According to the type you provide the Commerce Engine will return the possibilities for the given data type. In our case, this is a string and this will return operators like “Equals”, “Equals case insensitive”, “Matches Regex” etc.
For the other value we need, we can use another default interface given by the Commerce Engine, the IRuleValue. And just like the previous, this interface also needs to know what data type we want to use.
public IBinaryOperator<string, string> Ny_Operator { get; set; }
public IRuleValue<string> Ny_SpecificFulfillment { get; set; }
Now that we have all the values we need, we can implement the Evaluate method that is required by the ICondition interface.
public bool Evaluate(IRuleExecutionContext context)
{
    //Get configuration
    var specificFulfillment = Ny_SpecificFulfillment.Yield(context);

    if (string.IsNullOrEmpty(specificFulfillment) || Ny_Operator != null)
    {
        return false;
    }

    //Get Data
    var cart = context.Fact<CommerceContext>()?.GetObject<Cart>();
    if (cart == null || !cart.Lines.Any() || !cart.HasComponent<FulfillmentComponent>())
    {
        return false;
    }

    var fulfillment = cart.GetComponent<FulfillmentComponent>();
    if (fulfillment == null)
    {
        return false;
    }

    //Validate data against configuration
    var selectedFulfillment = fulfillment.FulfillmentMethod.Name;
    return Ny_Operator.Evaluate(selectedFulfillment, specificFulfillment);
}
In the Evaluate method we first get the configured values of the interfaces we defined earlier and check if they all got a value. When this is correct, the next thing is to check if the cart we are evaluating exists, has one or more products on it, and last but not least, has a fulfillment set.
If we pass this stage, we can check if the cart’s fulfillment method and the configured fulfillment method matches using the operator.

Adding the benefit
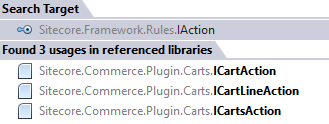
After we have created the condition we can continue with the benefit. And just like the qualification Commerce Server also got another interface name to use for a benefit, IAction (or one of its extending interfaces).
Let’s start creating the benefit by adding a folder named Action and add a class for our action “Get $ [amount] off the fulfillment costs” with the name CartAmountOffFulfillmentAction. Because our action is for only the total cart and not on a line item of a cart, we can implement the ICartAction interface on this class.
[EntityIdentifier("Ny._" + nameof(CartAmountOffFulfillmentAction))]
public class CartAmountOffFulfillmentAction : ICartAction
Just like in the condition we created earlier, we add the properties needed with an IRuleValue. In this case we just want one property, the amount of discount we want to give on the shipping costs.
public IRuleValue<decimal> Ny_SpecificAmount { get; set; }And again, after we got the properties we can write the code for the needed interface methods, in this case the Execute method.
public void Execute(IRuleExecutionContext context)
{
    //Get configuration
    var commerceContext = context.Fact<CommerceContext>();
    var cart = commerceContext?.GetObject<Cart>();
    if (cart == null || !cart.Lines.Any() || !cart.HasComponent<FulfillmentComponent>())
    {
        return;
    }

    var amountOff = Ny_SpecificAmount.Yield(context);
    if (amountOff == 0)
    {
        return;
    }

    //Get data
    var fulfillmentFee = GetFulfillmentFee(cart);
    if (fulfillmentFee == 0)
    {
        return;
    }

    if (amountOff > fulfillmentFee)
    {
        amountOff = fulfillmentFee;
    }
    amountOff = amountOff.ShouldRoundPriceCalc(commerceContext);

    //Apply action
    cart.Adjustments.AddCartLevelAwardedAdjustment(commerceContext, amountOff * -1, nameof(CardAmountOffShippingAction));

    cart.GetComponent<MessagesComponent>()
        .AddPromotionApplied(commerceContext, nameof(CardAmountOffShippingAction));
}

private static decimal GetFulfillmentFee(Cart cart)
{
    if (cart.HasComponent<SplitFulfillmentComponent>())
    {
        return cart.Lines
            .Select(line => line.Adjustments.FirstOrDefault(a => a.Name.EqualsOrdinalIgnoreCase("FulfillmentFee")))
            .TakeWhile(lineFulfillment => lineFulfillment != null)
            .Sum(lineFulfillment => lineFulfillment.Adjustment.Amount);
    }

    var awardedAdjustment = cart.Adjustments.FirstOrDefault(a => a.Name.EqualsOrdinalIgnoreCase("FulfillmentFee"));
    return awardedAdjustment?.Adjustment.Amount ?? 0;
}
We start the method with checking if the cart has any lines and if a Fulfillment is set. After this the configured value for the discount must be checked.
If these are all valid the next step is to check what the costs of the configured fulfillment is. We don’t want to give the customer a higher discount than the costs are. Getting the fulfillment costs is a direct copy from a build-in action (Sitecore.Commerce.Plugin.Fulfillment.CartFreeShippingAction) and we can use this value to check against the configured discount and use the lowest price.
The last step is to round the price if the commerce server is configurated this way. We’ve made an extension method for this so we can use it in all our actions, the code can be found below.
Now that all the requirements are checked and met, the discount can be added to the cart. The first thing to do is adding a CartLevelAwardedAdjustment to the carts adjustments and after that we add a message to the cart to let the customer know that this promotion is applied. For both these methods we also made an extension method and can be found in the code below.
internal static decimal ShouldRoundPriceCalc(this decimal input, CommerceContext context)
{
    if (context.GetPolicy<GlobalPricingPolicy>().ShouldRoundPriceCalc)
    {
        input = Math.Round(input,
            context.GetPolicy<GlobalPricingPolicy>().RoundDigits,
            context.GetPolicy<GlobalPricingPolicy>().MidPointRoundUp
                ? MidpointRounding.AwayFromZero
                : MidpointRounding.ToEven);
    }

    return input;
}

internal static void AddCartLevelAwardedAdjustment(this IList<AwardedAdjustment> adjustments, CommerceContext context, decimal amountOff, string awardingBlock)
{
    var propertiesModel = context.GetObject<PropertiesModel>();
    var discount = context.GetPolicy<KnownCartAdjustmentTypesPolicy>().Discount;

    var adjustment = new CartLevelAwardedAdjustment {
        Name = propertiesModel?.GetPropertyValue("PromotionText") as string ?? discount,
        DisplayName = propertiesModel?.GetPropertyValue("PromotionCartText") as string ?? discount,
        Adjustment = new Money(context.CurrentCurrency(), amountOff),
        AdjustmentType = discount,
        IsTaxable = false,
        AwardingBlock = awardingBlock,
    };

    adjustments.Add(adjustment);
}

internal static void AddPromotionApplied(this MessagesComponent messageComponent, CommerceContext context, string awardingBlock)
{
    var propertiesModel = context.GetObject<PropertiesModel>();
    var promotionName = propertiesModel?.GetPropertyValue("PromotionId") ?? awardingBlock;
    messageComponent.AddMessage(context.GetPolicy<KnownMessageCodePolicy>().Promotions, $"PromotionApplied: {promotionName}");
}
Final step
Now we have the condition and benefit in place, there is only one small thing we need to do.
We need to let the Sitecore installation know that our assembly has got some items that can be used in the rules engine. To do this we have to add the following line in the ConfigureSitecore.cs file.
services.Sitecore().Rules(rules => rules.Registry(reg => reg.RegisterThisAssembly()));After this, we can deploy the compiled DLL to the Commerce Engine and start testing and using the build condition/action.
Problems found and solved
Boolean values
Beside these two objects Nyxie contains more conditions and actions and in several we needed an IRuleValue with the data type Boolean. However out-of-the-box Sitecore only supports the data types
- DateTime
- DateTimeOffset
- Int32
- Decimal
Fortunately we were not the first to encounter this issue. This article explains what you need to do to override the default behaviour.
DateTime values and operators
In another condition we wanted to use an IRuleValue for a date and use an IBinaryCondition on its value. This is where it got a bit strange.
The IBinaryCondition only has operators for the DateTime type, so we added an IRuleValue with the DateTime type as well. When we saw the rendering in Commerce server the date was a normal textbox and not a datepicker and that’s what you want for your customers.
To fix this we had to change the IRuleValue to a DateTimeOffset and after getting the value from this property getting the .DateTime. Not the nicest solution but it did the trick. A user can select a date and we can use the out-of-the-box date operators.
Want to know more?
And that is it for now. Hopefully this blog helps you with the development of your own qualification or benefit for the SiteCore Commerce platform. A second blog will come online shortly where we will dive into an improvement we made for the display of the qualifications and benefits. Need some help right away? Just reach out to us!
In the meantime you can view the complete code of Nyxie at https://github.com/avivasolutionsnl/nyxie
- nyxie
- sitecore commerce
- benefits
- qualifications